e36 a/c control unit repair
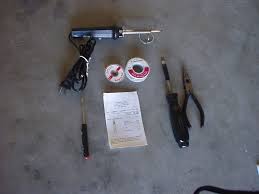
Is your E36 climate control display dark? Do buttons lighten up and darken randomly, with button illumination apparently unrelated to what the heater and A/C are actually doing at the moment? Does it turn off and reset itself randomly? You could spend hundreds of dollars on a new or used unit. You could send it out and have somebody repair it. Or fix it yourself in about an hour for just a few dollars! I made this repair on my E36 more than 5 years ago and it is still working fine. Locate your climate control unit in the dash. If you drive an E36, it should look exactly like this. If you have the manual control type with the knobs, and it does not look like this, these instructions will not help you. (Pelican Note: When working on your car's electronics, it is a wise idea to first disconnect the battery) If your car has a multifunction display, remove all the junk from the storage compartment beneath it. Now stick your fingers up through the hole in the top of that compartment and pull out your multifunction display.

There are bumps on the sides, top, and bottom of the multifunction display that keep it in place. You may find it easier to remove if you insert a flat blade to help them snap out of their recesses. Also, the flat blade keeps the edge of the vinyl dash cover from catching on the display and tearing loose from the dash as you pull the display out. Just let the multifunction display hang by its wires. If any of those four bulbs across the top that illuminate the display and clock are burned out, now would be a good time to replace them. Find the bulbs here in the Pelican catalog. The climate control unit snaps out just like the multifunction display did. Release the latch on the main plug. The smaller (black) plug just pulls straight out. Remove the two screws that secure the fan. Either a phillips or straight blade screwdriver works on these screws, but a small straight blade works better. A little canned air cleaned out all the accumulated dust. As with the screws that secure the fan, the four screws that secure the face plate are most easily removed with a small straight blade screwdriver.

Remove the face plate. This side unsnaps with a little help from the small screwdriver. Squeeze the release on the other side with needle-nosed pliers. With the face plate off, the front circuit board snaps out easily. Let it dangle by its wires. (Pelican Note: when handling circuit boards, it's always a good idea to ground yourself to prevent static electricity from damaging the board). Pull out the circuit board. The circuit board is held in place by a tabs on each end of the board that sticks out from the circuit board and fits into rectangular holes in the plastic case. How you get it free is up to you. Just be careful not to bend the circuit board, as it might crack. Once the tabs are free from their holes, you can pull the board, or push it from the rear using the holes in the back of the case. The red arrow points to the 0.47 uF capacitor that has failed and must be replaced. Scrape off the varnish. There is varnish on both sides of the board. The capacitor will be easier to break loose if you scrape the varnish from this side, and you MUST scrape the varnish from the contacts on the back side so you can desolder them.
This picture shows the old blue 0.47 uF capacitor and new gold 1 uF tantalum capacitor.
stealing copper from ac unitsOn the board, the two holes that look silver, just to the left of that tiny surface mount resistor, are the solder contacts for the cap.
freon leak repair kitI did not desolder these as cleanly I should have.
heil air conditioning unit parts This tantalum cap appears to use the same convention as an LED (long lead is positive). If you are using a polar capacitor like this one, I have read that the positive side is the side closest to the edge of the board. Push the leads from the new capacitor through the holes and solder them neatly. Then trim off the excess lead. Here is the finished product - my brand new tantalum capacitor soldered in where the original capacitor used to be.

Now put everything back where you found it. This is one of the few jobs where things go back together a lot easier than they came apart. I hope that your heater and air conditioner work now. Well, there you have it - it's really not too difficult at all. If you would like to see more technical articles like this one, please continue to support Pelican Parts with all your parts needs. If you like what you see here, then please visit our online BMW catalog and help support the collection and creating of new and informative technical articles like this one. Your continued support directly affects the expansion and existence of this site and technical articles like this one. As always, if you have any questions or comments about this helpful article, please drop us a line. We know you want the best driving experience possible - and that includes the comfort of air conditioning in the summer and heat in the winter. Without a functioning heater blower motor, neither of these are a possibility.

Find the perfect replacement for your damaged heater blower motor at AutoZone and hit the road in comfort once again. Check Availability and Pricing Information Replaces O.E.M. motor stamped 5049610. Driving without air conditioning or the heater can make for an uncomfortable trip. A likely cause for a busted AC or heating unit is a damaged blower-motor. A lack of airflow from your vents is a clear indicator that it may be time for a heater blower motor replacement. With our wide variety of replacement AC heater blower motors, AutoZone can help make your ride enjoyable again - no matter what you drive. Whether you need a Jeep Cherokee AC heater blower motor, an AC blower motor for Chevy Tahoe or anything in between, AutoZone has everything you need. All of our products exceed OE design and allow your heat and air conditioning to run at top-notch quality again. Shop with us and enjoy Free Shipping on orders of $75 or more. Or, choose our Same Day Store Pickup option to grab your purchase from your local AutoZone and start your project today.