furnace blower motor works intermittently

The ability to move air rapidly and efficiently in HVAC systems is essential to achieving a cost-efficient comfort system. The electrical motors that were used in HVAC applications were AC induction style motors that were either single-or multi-speed — they'd run at one speed for heating, another for cooling, and sometimes a third speed for two-stage systems. The problem with these types of motors is that they use a lot of energy because they run at full amp draw at all times — even during off-demand cycles. Also, since the motors run on high speed all the time, the noise levels are also high. To address these two concerns — efficiency and noise — the electronically commutated motor (ECM) was developed. According to GE, an innovator in ECM technology, the wide range of the ECM motor, high efficiency, and programmability gives it a virtually unlimited range of performance characteristics. Of course, the increasing popularity of the ECM motor has led to a number of questions from technicians on how to service and troubleshoot ECMdriven systems.

GE offers a few basic checks that technicians should perform before troubleshooting the ECM motor. One thing to always keep in mind, however, is to always consult the manufacturer's guide to confirm proper configurations and demands. If these checks don't resolve the problem, or if the fault code reveals a motor problem, then it's time for some additional diagnostics. For most models of ECM motors, it is normal for the motor to rock back and forth on start up. If this is the only symptom identified, there is no need to replace the motor. However, if the system is excessively noisy, doesn't appear to change speeds in response to a demand for heat or cooling, or is having symptoms during the cycle such as a tripping limit or freezing coil, there are a number of checks that can be performed. Wait for programmed delays to time out. If delays are too long, then reset them using the manufacturer's chart. Ensure the airflow settings are correct for the installed system using the charts. Remember that the change in airflow between continuous-fan speed and low stages of operation may be very slight depending on the size of the system.

If the system is operating normally in each stage, then there is no problem. Remove the filter and check that all of the dampers, registers, and grills are open and free-flowing. If removing the filter corrects the problem, clean or replace with a less restrictive filter. Also, check and clean the blower wheel, secondary heat exchanger, and evaporator coil.
tempstar hvac unitIf this doesn't correct the problem, then check the external static pressure.
lg ductless air conditioner remote control instructionsIf it's higher than the manufacturer's recommendations, then correct the airflow restriction.
trane ac repair houstonIf the motor does not shut off at the end of the cycle, check the delay times and wait for delays to time out.

Make sure that there is no call for "continuous fan" on the G terminal. This motor may take a while to come to a complete stop with selected delays and the normal ramp down. There are also a few checks you can perform if the ECM motor is not running. First, check for proper high-voltage and ground at the five-pin connector at the motor. Correct any voltage issues before proceeding. ECM motors are dual voltage motors capable of operating in 120 or 240VAC systems. On the 120VAC systems, there should be a jumper between terminals one and two. On 240VAC systems, the jumper should be removed. If the motor is operating at 240VAC with the jumper in place, the motor will be permanently damaged. ECM Service Tech Tips Tech Tip 1: Don't automatically assume the ECM motor has failed. Make sure you go through the diagnostic steps completely before replacing the motor. Tech Tip 2: When it's necessary to disconnect the power from the HVAC system, it's always a good practice to verify that voltage has been disconnected, by using a voltmeter.

Tech Tip 3: A True-RMS meter isn't needed to check high-or low-voltage to the motor. Tech Tip 4: If you must replace the 2.0, 2.3, or 2.5 control module, then be sure to use a direct replacement from the manufacturer. ECM control modules are factory programmed for specific manufacturer applications. If you use the wrong control module, it will void all product warranties and may result in improper or no blower operation. Tech Tip 5: If a check of the control module indicates replacement is required, then also check the motor module. Installing a new control on a failed motor will result in the new control also failing. Tech Tip 6: Always pull the connector and not the wires. Most connectors are also keyed. Reconnecting a connector the wrong way could damage the motor. Tech Tip 7: When checking any plug connector, the meter leads are most likely larger than the terminals or socket. Using thin leads will prevent the terminals from being damaged by a voltage check. From the GE ECM Service Guide
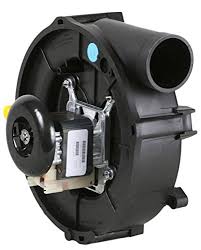
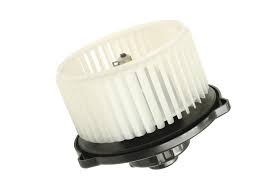
Furnace Sometimes Doesn’t Heat FURNACE SOMETIMES DOESN’T HEAT – In this situation, a gas furnace will heat most of the time, but every once in a while will stop operating. There are several issues that can cause this – most require the services of a qualified service technician. Dirty Flame Sensor - Qualified Technician Recommended Bad Vent Motor - Qualified Technician Recommended Bad Pressure Switch - Qualified Technician Recommended Bad Blower Motor - Qualified Technician Recommended Bad Capacitor - Qualified Technician Recommended < Prev Next > We are excited to have you become a member of the General Heating & Air Conditioning family. To schedule an appointment all you need to do is Call Today or Click Here for online chatDirt or grime on the commutator can result in intermittent contact and erraticCarbon or metal particle buildup can partially short the motor making it impossible for the controller to provide enough voltage to maintain
Sometimes, a quick squirt of degreaser through the ventilation holes at the connection end will blow out the shorting material. ruin the motor, but it would need replacement otherwise anyway. worked on Pioneer PDM series spindle motors. Another technique is to disconnect the motor completely from the circuit and power it for a few seconds in each direction from a 9 V or so DC source. This may blow out the crud. The long term reliability of both of these WARNING: Never attempt to power a motor with an external battery or power supply when the motor is attached to the appliance, particularly if it contains any electronic circuitry as this can blow electronic components and complicate your problems. It is sometimes possible to disassemble the motor and clean it more thoroughly but this is a painstaking task best avoided if possible. See the section: "Disassembling and reassembling a miniature PM motor". Note: for motors with carbon brushes, refer to the section: "Disassembling and reassembling a universal or induction motor".
This procedure below is for those tiny PM motors with metal brushes. Unless you really like to work on really tiny things, you might want to just punt and buy a replacement. This may be the strategy with the best long term reliability in any case. However, if you like a challenge, read on. CAUTION: disassembly without of this type should never be attempted with high quality servo motors as removing the armature from the motor may partially demagnetize the permanent magnets resulting in decreased torque and the need to replace the motor. However, it is safe for the typical small PM motor found in appliances and power tools. Select a clean work area - the permanent magnets in the motor will attract all kinds of ferrous particles which are then very difficult to remove. Follow these steps to minimize your use of 4 letter expletives: 1. Remove the load - fan blades, gears, pulleys, etc. the power wiring as well as the motor will be a whole lot easier to work
on if not attached to the appliance or power tool. critical - take note of the wire colors or orientation of the motor if it is directly soldered to a circuit board! 2. Confirm that there are no burrs on the shaft(s) due to the set screw(s) that may have been there. For motors with plain bearings in particular, these will need to be removed to allow the shaft(s) to be pulled out without damage to the bushing. 3. Use a scribe or indelible pen to put alignment marks on the cover so that it can be replaced in the same orientation. 4. Make yourself a brush spreader. Most of these motors have a pair of elongated holes in the cover where the power wires are connected toThese allow the very delicate and fragile metal brushes to be spread apart as the armature is removed or installed. the brushes will get hung up and bent. I have found that a paper clip can be bent so that its two ends fit into these holes and when rotated will safely lift the brushes out of harm's way.

5. Use a sharp tool like an awl or dental pick to bend out the 2 or 3 tabs holding the cover in place. 6. Insert the brush spreader, spread the brushes, and pull the cover off ofIf done carefully, no damage will be done to the metal brushes. 7. The armature can now be pulled free of the case and magnets. 8. Identify any flat washers or spacers that may be present on the shaft(s). Mark down their **exact** location and orientation so that they may beClean these and set aside. Inspect all components for physical damage or evidence of overheating orBad bearings may result in very obvious wear of the shaft or bushings or show evidence of the rotor scraping on the stator core. Extended overloads, a worn commutator, or shorted windings may result in visible or olfactory detected deterioration of wire insulation. Check that the gaps in the commutator segments are free of metal particlesUse a sharp instrument like an Xacto knife blade to

carefully clear between the segments. Clean the brushes (gentle!), shafts, When reassembling, make sure to use your brush spreader when installing the If the noise is related to the rotating motor shaft, try lubricating the motor (or other suspect) bearings - a single drop of electric motor oil, sewing machine oil, or other light oil (NOT WD40 - it is not a suitable lubricant), to the bearings (at each end for the motor). This may help at least as aIn some cases, using a slightly heavier oil will help withSee the section: "Lubrication of appliances and electronic equipment". For AC motors in particular, steel laminations or the motor's mounting may be loose resulting in a buzz or hum. Tightening a screw or two may quiet it down. Painting the laminations with varnish suitable for electrical equipment may be needed in extreme cases. noise may actually be a result of a nearby metal shield or other chassis hardware that is being vibrated by the motor's magnetic field.