jeep cherokee ac delete

Buy online and return core parts to the store to be refunded the price. On Orders $75 or Greater and free shipping to APO, FPO, DPO addresses. Save time by buying online and picking up items in store. Like most DIYers I see a problem and the last thing I think about is "where do I take this to get it fixed?" I instead look at a problem and try to outwit traditional solutions. That being said, when I didn't have heat in my Jeep Grand Cherokee (JGC) during our first cold snap I naturally went online to diagnose and solve the problem. What I discovered was this is a very common problem with my model of JGC (1999-2004). I love my Jeep, but the person that designed this blend door actuator system needs to find new work. The design is inherently weak, and relies on a calibration phase that puts intense pressure on the weakest points in the system. Not wanting to repair the faulty design with the same OEM design, I set out to reverse engineer a long-term solu

tion This website was among the more helpful sites as it provides Jeep's Repair kit instructair/ This site does a good job of where and how to cut, so I will not re-invent the wheel. I'll show you my solution to the kit from Jeep. Total Cost of Proj
ac unit economizerect: $1.76 Mending plate ($0.88
automotive ac repair lakeland flx 2) $3.36 Hinges ($1.18
trane air conditioners packaged unitsx 2) Required Materials / Tools: 4 - 1/8" rivets 1 - Rivet gun hacksaw or rotary tool (the hacksaw requires more patience than I possess) DrillStep 1: Problem...Show All Items« PreviousNext »View All Steps Do shawn, the heater core is located in the heater-A/C housing, under the instrument panel.

It is a heat exchanger made of rows of tubes and fins. If you want to replace it (your question did not ask for it ;-) follow the instructions from the Service Manual: WARNING: ON VEHICLES EQUIPPED WITH AIRBAGS, REFER TO GROUP 8M - PASSIVE RESTRAINT SYSTEMS BEFORE ATTEMPTING ANY STEERING WHEEL, STEERING COLUMN, OR INSTRUMENT PANEL COMPONENT DIAGNOSIS OR SERVICE. FAILURE TO TAKE THE PROPER PRECAUTIONS COULD RESULT IN ACCIDENTAL AIRBAG DEPLOYMENT AND POSSIBLE PERSONAL INJURY. (1) Remove and disassemble the heater-A/C housing. See Heater-A/C Housing in this group for the procedures. (2) Lift the heater core out of the lower half of the heater-A/C housing (Fig. 48). (3) Reverse the removal procedures to install. Be certain that the heater core foam insulator is reinstalled. Any kinks or sharp bends in the refrigerant plumbing will reduce the capacity of the entire air conditioning system. Kinks and sharp bends reduce the flow of refrigerant in the system. A good rule for the flexible hose refrigerant lines is to keep the radius of

all bends at least ten times the diameter of the hose. In addition, the flexible hose refrigerant lines should be routed so they are at least 80 millimeters (3 inches) from the exhaust manifold. High pressures are produced in the refrigerant system when the air conditioning compressor is operating. Extreme care must be exercised to make sure that each of the refrigerant system connections is pressure-tight and leak free. It is a good practice to inspect all flexible hose refrigerant lines at least once a year to make sure they are in good condition and WARNING: REVIEW THE WARNINGS AND CAUTIONS IN THE FRONT OF THIS GROUP BEFORE PERFORMING THE FOLLOWING OPERATION. (1) Disconnect and isolate the battery negative cable. (2) Recover the refrigerant from the refrigerant system. See Refrigerant Recovery in this group for the procedures. (3) Disconnect the liquid line refrigerant line couplers at the evaporator inlet and the condenser outlet (Fig. 49). See Refrigerant Line Coupler in this group for the procedures.

Install plugs in, or tape over all of the opened refrigerant line fittings. (4) Remove the liquid line from the vehicle. The heater-A/C housing assembly must be removed from the vehicle and the two halves of the housing separated for service access of the heater core, evaporator coil, blend-air door, and each of the various mode control doors. (2) Remove the instrument panel from the vehicle. Refer to Instrument Panel Assembly in Group 8E - Instrument Panel Systems for the procedures (3) If the vehicle is not equipped with air conditioning, go to Step 6. If the vehicle is equipped with air conditioning, recover the refrigerant from the refrigerant system. (4) Disconnect the liquid line refrigerant line fitting from the evaporator inlet tube. (5) Disconnect the accumulator inlet tube refrigerant line fitting from the evaporator outlet tube. See Refrigerant Line Coupler in this group for the procedures. Install plugs in, or tape over all of the opened refrigerant line fittings.
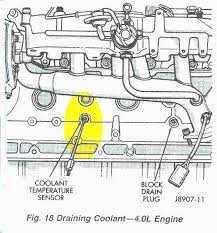
(6) Drain the engine cooling system. Refer to Group 7 - Cooling System for the procedures. (7) Disconnect the heater hoses from the heater core tubes. Refer to Group 7 - Cooling System for the procedures. Install plugs in, or tape over the opened (8) Unplug the heater-A/C system vacuum supply line connector from the tee fitting near the heater core tubes. (9) Unplug the heater-A/C unit wire harness connector, which is fastened to the heater-A/C housing next to the blower motor relay (Fig. 39). (10) Remove the five nuts from the heater-A/C housing mounting studs on the engine compartment side of the dash panel (Fig. 40). Remove or reposition the evaporation canister for additional access, if required. (11) Pull the heater-A/C housing rearward far enough for the mounting studs and the evaporator condensate drain tube to clear the dash panel holes. (12) Remove the heater-A/C housing from the vehicle. Hope this helps, good luck.Motor Vehicle Maintenance & Repair

My A/C system has a leak in it and my compressor is making an awful noise: probably needs replacing. Winter is coming though, and I really don't want to spend any time or money on tracking down leaks and converting to 134a and all that jazz. What I want is the simplest way to make the compressor stop spinning when the engine is on. Can I just cut/remove the belt? Could that have negative side effects? The compressor is on a belt by itself. It's the only reason I would consider removing the belt completely. Also, are there any significant advantages or disadvantages to removing a non-functioning A/C system entirely? Unless the compressor is on a belt by itself, you don't want to remove the belt. Water pumps, alternators and power steering are nice things to have. An A/C delete/bypass pulley for your application would be a way to go, but it will involve pulling the compressor. Probably the easiest thing to do is locate the appropriate relay and pull it. If it's the compressor making the noise and not the pulley/clutch, that should work.

Otherwise it's pulley time. If the compressor is on a belt by itself, I guess you could remove the belt. I would still look for the relay and pull it, though. If it was my car, I wouldn't want to drive it long term without putting the delete pulley on. I would be worried the belt off situation was a corner case the engineers didn't worry about. Keep in mind that whatever leaks you have now are possibly going to multiply if you leave the system unpressurized for an extended period. Also, the compressor is engaged intermittently when you turn on the defroster to dry the air. If your windshield fogs up it will take longer to clear without the compressor. Cutting the belt will solve your problem as long as the belt doesn't drive any other component. If it's making noise all the time you likely only need to replace the pulley, which may be cost effective. Sometimes it cheaper to replace the the compressor/pulley/clutch combination. If there is a seperate fuse or relay for the compressor, then you could remove either.